Thursday, December 2, 2010

A Christmas Present for Mad

To start with, in case you all are wondering why I call my husband Mad, it is not because he is some abnormally angry person.  He had that name since long before we met and he was still a cool rock star, aka, Mad Chad.  Now he is Dad Chad, but for all intents and purposes I will continue to call him Mad Chad, cause he is still a rock star to me.

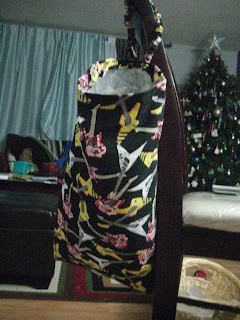
Now, Mad is the coolest person he knows.  He drives a cool vehicle, plays cool guitars and drums and starts cool new facial hair trends at his work.  Plus, if there is something that he wants, that he doesn't already have, he will just go buy it.  So what do you get the coolest person who has everything? Well I'm glad you asked.  You make him something.  The thing about the cool car is that he is ultra sensitive to any mess in it (yes we do have 3 kids), so I decided to make him a cool garbage bag for his car.  He can hang it in the front seat when it's just him, or flip it round back so that the kids can use it in the back seat, cause it hangs from the headrest.  I saw this idea somewhere on another blog and would totally give props, but I can't remember where it was or on what blog, so if it's yours and you are reading this, thank you.

Here goes:

Step 1:
Find super cool material.  I happened to find guitar flannel.  Not just guitars though, it has the Eddie Van Halen signature guitar print on it.  Mad will love it.

Step 2:
Cut your material, for the bag I used The flannel, cut 40" x 14", I cut a plastic table cloth the same and made a casing for the elastic 40"x 1".  Oh and the elastic is I made 14"long (1/4").

Step 3:
I made the casing for the elastic, fold the long strip in half, lengthwise, right sides together and sew with a zigzag stitch.
Turn the casing right side out, I used a bbq skewer.

Thread the elastic through and sew at each end. You will have a nice gathered elastic cover.

Step 4:
Sew the plastic together, up the sides. (I had troubles with this, cause the plastic kept sticking to the machine, so I just lifted the presser foot and made a pretty sloppy stitch, but it's covered)

Step 5:
Fold the larger piece of material in half, sideways, right sides together, and sew up the sides.  Turn it right side out and you should have "a bag".
I know its a repeat pic, but my camera was dying so I worked with what I could

Step 6:
Place plastic bag inside flannel bag and pin corners together.  At the top, fold over about 1/2" and sew a top stitch around the top of the bag.  DO NOT FINISH IT ALL THE WAY!!!!!  About 1/2 way on one side, slide one end of the elastic casing under the presser foot as you are sewing and double back over it. About 1" over, do the same with the other end of the casing.  Finish the seam.

Step 7:
Sew a top stitch along the sides and bottom of the bag.  This will prevent the plastic bag from slipping inside and give you a neat finish.


Wrap it up and I hope he likes it. 

Enjoy your day, enjoy your family and happy crafting!

Wednesday, December 1, 2010

SQEEEEEEEK!!!!

Chaos doesn't talk much, so it's hard to write anything about him, but the last couple days, he's been giving me gems.  For starters, I am sure no on believes that he can say anything other than no, but we have good conversations all day and his vocab is coming along.  Also, he has decided to go against my wishes and start potty training himself.  Normally, people aren't opposed to this, but he is my last baby, and he is just that, a baby, so it's a hard pill to swallow.  However, on the numerous occasions that I sit in the bathroom with him, waiting and waiting (he tries), he talks.  He tells me what his body is doing.  The other day, he farted and he told me "mamma, bum, SQEEEEEEEEEK" How can you not laugh at that, he was so serious and he scrunched up his eyes when he said it.  It was the funniest thing I have heard come out of his mouth.

Second story, short butt quick (did you see what I did there, I made a funny, cause it's another bum story.  I love babies) A friend of mine, hendrix wife, was camping with her daughter Gouie, when all of a sudden she came running up to her and said "Mommy, my bum hurts" and hendrix wife, looking confused, of course asked her why.  Her answer was simple.  "Because there's a hole in it"  Common sense right?  

From the mouths of babes...... An I get to write about it.  It really is a beautiful thing that I have the pleasure of keeping these memoirs for the future, like grad, or first girl/boyfriends, or weddings.  Cause it's gonna have to be brought up by then.  Sorry guys.

Just a quick copy from fellow blogger, trashybetty,blogspot.com, on a subject that means a whole lot to me.  Please take the time to read it and wear red with me on friday in support of suicide awareness.

About 90 Americans committed suicide today. Ninety will tomorrow. Six-hundred and thirty will next week. Someone did 15 minutes ago, and someone will 15 minutes from now. Individuals commit suicide because of mental illness, such as PTSD, depression, schizophrenia, postpartum depression, bipolar disorder, and anxiety disorders, amongst many other mental illnesses, verbal abuse, domestic violence, bullying, cyber bulling, sexual harassment, rape, teen pregnancy, divorce, terminal disease diagnosis, racism, and poverty. Suicide is very real and very scary. Most of us know someone who committed or attempted suicide. It is important for us to remember all whose lives were taken or changed by suicide. Talk to people, listen to people, if someone tells you they are thinking about suicide don't blow it off. Learn the signs that someone may be going to commit suicide. I can't stress this enough. Suicide is a big deal... it is everywhere... Raise general suicide awareness. Wear red Friday, December 3rd, to raise suicide awareness. Copy this and paste this onto your profile, talk to your friends. Everyone is loved by someone. Let those you know know that you love them, you could be the difference in their lives. Be there for those who are struggling. If you are struggling, know you are not alone. Find someone to talk to who will be willing to listen. Three people have committed suicide in the time I started writing this to right now. -author unknown

Hope you all enjoy your day, listen to your kids, you never know what you'll hear.  Happy crafting and I will see you back here tomorrow for another tutorial (if I decide by then what I want to do, lol).


Tuesday, November 30, 2010

Hoo Are You Link Up/ #25


1. Do you like to listen to Christmas music?
I love Christmas Music, Can we all say Boney M christmas Album?
2. Are you one of those people who get all their shopping done early,
or do you do most of it in December?
I am generally finished all my shopping by October, Yes it is obnoxious on my part, but it saves me stress in the long run.
3. Do you set a budget on how much you spend on each person?
No budget, because I start so early I find fantastic deals all year, so I try to plan it so that the kids all have roughly the same amount of presents and just try to get great stuff.
4. Do you send out Christmas cards?
With pictures!
5. Do you enjoy this holiday season or does it stress you out?
I enjoy the stress of the holiday season!

Toques and Mitts for the Giving Tree

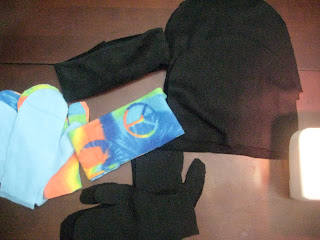
I had everything finished by this morning.  I finished sewing way before I was supposed to post this, however, as always, my morning did not go as planned.  Surprised? I'm not. But never the less, it's here.  I made 2 ear warmers, 2 toques and 2 pairs of mitts for the Giving Tree at YaYa and Supernan's school.

It was really easy to do..... Recognize the material?  I used the scraps of fleece that I had in my stash and was able to come up with a few things.  I will probably go get some more and make some more, as the kids like that I was able to do this and would rather that I sew than buy it.

But first, a pic of half of my on the go projects, all due in 2 weeks.

And now on to the actual tutorial:
Mitts
Step 1:
Cut a mitt pattern around your hand, (I am not a giant fan of actual patterns, as I have said in the past) and cut 3 more in the same material, then cut 4 in a coordinating material.  This will give you a lined pair of mitts.  Make sure to leave a 1/2 inch seam allowance.

Step 2:
Sew around mitt liner, leaving the bottom open.  Measure and cut a 1/4 inch elastic to fit around your wrist snugly. Attach it to the bottom of the mitt liner about 1 inch up, with a loose stitch to allow for pulling.  Place the right sides of the outer material together, and sew around the edge, 1/2 inch seam allowance.  Turn right side out and repeat with the other set of mitts.


Step 3:
Tuck liner into outer shell and tuck edges under, sew with a 1/4 inch seam allowance, taking care not to sew the mitt together.  (I did this already)

Ear warmer
Step 1:
Cut material about 8 inches wide and measured to fit around your head in length, adding about 1 inch for finishing.

Step 2:
Fold in half lengthwise with right sides together.  Sew a seam along the length of the ear warmer. Turn right side out.

Step 3:
Fold in open edge about 1/4 inch, and slip other open edge in and pin.

Step 4:
Sew a 1/4 inch seam across, taking care again not to sew it together from the backside.
Step 5:
Get daughter to model and make her model face!

Toque
Step 1:
Cut a half circle, measured about 11 inches from side to side and about 7 inches up to the meet in the middle. Cut 2.
(pardon the sideways picture)

Step 2:
Run a 1/4 inch seam around the toque and cut away any excess material.

Step 3:
At the bottom, fold up at least 2 inches (for added ear warmth) and sew a zigzag stitch to keep it up.


Step 4:
Get son to make a ridiculous face as he is modeling the toque.

Yes my children love the camera.

See you here tomorrow as you all are excited to hear a classic phrase from gouliana.

Enjoy your day, enjoy your family and happy crafting.

Monday, November 29, 2010

Gratitude and an Apology

Hi everyone out there in blogland.  It has been a whirlwind weekend for for me and I owe you all an apology, as I am sure that you were all waiting for a fabulous recipe for the weekend.  I do have a few legitimate excuses though.  Number 1, we have been having troubles with our internet losing service on and off, it was off on sat.  Number 2, Mad Chads Christmas party was on Sat night, and quite frankly, it took me 7 hours to preen myself in order to be ready.  Not that conceited, but I did have laundry to do and dishes and everything in between.

And we also had the pleasure of going to the 98th Grey Cup on Sunday night.  AWESOME!!!!! Unfortunately my team lost again, but it was well worth freezing my butt off to go.

On to the post of the day, for Meditation Monday.  I am going to take an exert right from the Yoga Journal Magazine.  I really enjoy reading the magazine and the emails that come through.  It has some very helpful hints and tips for yoga positions and meditation.  Please check it out and let me know what you think of the magazines website.  Until you have a chance to check it out, I hope you enjoy this exert.  As the holiday season is upon us this rings very true.


Cultivating gratitude is less an act of creating something that 
isn't there and more of a practice of realizing what is. It's about 
reminding yourself of the miracles embedded in every second
 of every day—from the largest blessings to the smallest 
moments. By practicing shifting your attention to what is real 
(and not clinging to an idea of what you think should happen),
 you become more appreciative of even the most mundane 
moments in life, and for the richness all around.

As for the recipe that I promised you, it's not one that will feed the family a whole meal, but I can guarantee that everyone in the family will enjoy it as will all of your holiday guests.
5 Minute Fudge

Ingredients

  • 2/3 cup (160 ml) evaporated milk
  • 1 1/2 cups (375 ml) sugar
  • 1/2 tsp (2.5 ml) salt
  • 1 1/4 cups (310 ml) Epicure’s Dark Belgian Chocolate
  • 16 marshmallows
  • 1 tsp (5 ml) Epicure’s Vanilla Extract
  • 1/2 cup (125 ml) chopped walnuts

Instructions

1. Combine milk, sugar and salt in Epicure’s Eclipse® Coated Professional Frying Pan. Bring to a boil. Cook for 5 minutes over medium heat, stirring frequently.
2. Remove from heat and stir in remaining ingredients until evenly mixed. Pour into a well-buttered or foil-lined 8" or 9" (20 cm or 23 cm) square pan and smooth over top. Refrigerate until set, and cut into 12 squares.
I have added different flavoring as opposed to vanilla and it is fantastic with a different flavor.

Hope you all enjoy todays post.  Hope the fudge works well for you and that you get a chance to experiment with different flavors.  
Enjoy your day, enjoy your family and see you all here tomorrow, I will have a tutorial ready for you, as I am making toques and mitts for the giving tree at school.