Tuesday, November 30, 2010

Hoo Are You Link Up/ #25


1. Do you like to listen to Christmas music?
I love Christmas Music, Can we all say Boney M christmas Album?
2. Are you one of those people who get all their shopping done early,
or do you do most of it in December?
I am generally finished all my shopping by October, Yes it is obnoxious on my part, but it saves me stress in the long run.
3. Do you set a budget on how much you spend on each person?
No budget, because I start so early I find fantastic deals all year, so I try to plan it so that the kids all have roughly the same amount of presents and just try to get great stuff.
4. Do you send out Christmas cards?
With pictures!
5. Do you enjoy this holiday season or does it stress you out?
I enjoy the stress of the holiday season!

Toques and Mitts for the Giving Tree

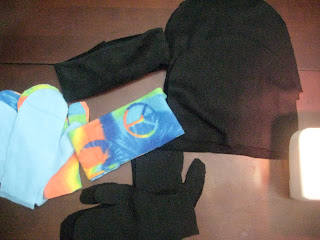
I had everything finished by this morning.  I finished sewing way before I was supposed to post this, however, as always, my morning did not go as planned.  Surprised? I'm not. But never the less, it's here.  I made 2 ear warmers, 2 toques and 2 pairs of mitts for the Giving Tree at YaYa and Supernan's school.

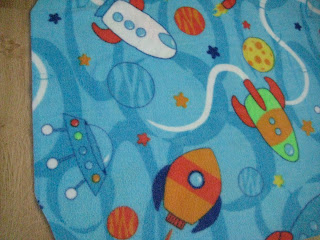
It was really easy to do..... Recognize the material?  I used the scraps of fleece that I had in my stash and was able to come up with a few things.  I will probably go get some more and make some more, as the kids like that I was able to do this and would rather that I sew than buy it.

But first, a pic of half of my on the go projects, all due in 2 weeks.

And now on to the actual tutorial:
Mitts
Step 1:
Cut a mitt pattern around your hand, (I am not a giant fan of actual patterns, as I have said in the past) and cut 3 more in the same material, then cut 4 in a coordinating material.  This will give you a lined pair of mitts.  Make sure to leave a 1/2 inch seam allowance.

Step 2:
Sew around mitt liner, leaving the bottom open.  Measure and cut a 1/4 inch elastic to fit around your wrist snugly. Attach it to the bottom of the mitt liner about 1 inch up, with a loose stitch to allow for pulling.  Place the right sides of the outer material together, and sew around the edge, 1/2 inch seam allowance.  Turn right side out and repeat with the other set of mitts.


Step 3:
Tuck liner into outer shell and tuck edges under, sew with a 1/4 inch seam allowance, taking care not to sew the mitt together.  (I did this already)

Ear warmer
Step 1:
Cut material about 8 inches wide and measured to fit around your head in length, adding about 1 inch for finishing.

Step 2:
Fold in half lengthwise with right sides together.  Sew a seam along the length of the ear warmer. Turn right side out.

Step 3:
Fold in open edge about 1/4 inch, and slip other open edge in and pin.

Step 4:
Sew a 1/4 inch seam across, taking care again not to sew it together from the backside.
Step 5:
Get daughter to model and make her model face!

Toque
Step 1:
Cut a half circle, measured about 11 inches from side to side and about 7 inches up to the meet in the middle. Cut 2.
(pardon the sideways picture)

Step 2:
Run a 1/4 inch seam around the toque and cut away any excess material.

Step 3:
At the bottom, fold up at least 2 inches (for added ear warmth) and sew a zigzag stitch to keep it up.


Step 4:
Get son to make a ridiculous face as he is modeling the toque.

Yes my children love the camera.

See you here tomorrow as you all are excited to hear a classic phrase from gouliana.

Enjoy your day, enjoy your family and happy crafting.

Monday, November 29, 2010

Gratitude and an Apology

Hi everyone out there in blogland.  It has been a whirlwind weekend for for me and I owe you all an apology, as I am sure that you were all waiting for a fabulous recipe for the weekend.  I do have a few legitimate excuses though.  Number 1, we have been having troubles with our internet losing service on and off, it was off on sat.  Number 2, Mad Chads Christmas party was on Sat night, and quite frankly, it took me 7 hours to preen myself in order to be ready.  Not that conceited, but I did have laundry to do and dishes and everything in between.

And we also had the pleasure of going to the 98th Grey Cup on Sunday night.  AWESOME!!!!! Unfortunately my team lost again, but it was well worth freezing my butt off to go.

On to the post of the day, for Meditation Monday.  I am going to take an exert right from the Yoga Journal Magazine.  I really enjoy reading the magazine and the emails that come through.  It has some very helpful hints and tips for yoga positions and meditation.  Please check it out and let me know what you think of the magazines website.  Until you have a chance to check it out, I hope you enjoy this exert.  As the holiday season is upon us this rings very true.


Cultivating gratitude is less an act of creating something that 
isn't there and more of a practice of realizing what is. It's about 
reminding yourself of the miracles embedded in every second
 of every day—from the largest blessings to the smallest 
moments. By practicing shifting your attention to what is real 
(and not clinging to an idea of what you think should happen),
 you become more appreciative of even the most mundane 
moments in life, and for the richness all around.

As for the recipe that I promised you, it's not one that will feed the family a whole meal, but I can guarantee that everyone in the family will enjoy it as will all of your holiday guests.
5 Minute Fudge

Ingredients

  • 2/3 cup (160 ml) evaporated milk
  • 1 1/2 cups (375 ml) sugar
  • 1/2 tsp (2.5 ml) salt
  • 1 1/4 cups (310 ml) Epicure’s Dark Belgian Chocolate
  • 16 marshmallows
  • 1 tsp (5 ml) Epicure’s Vanilla Extract
  • 1/2 cup (125 ml) chopped walnuts

Instructions

1. Combine milk, sugar and salt in Epicure’s Eclipse® Coated Professional Frying Pan. Bring to a boil. Cook for 5 minutes over medium heat, stirring frequently.
2. Remove from heat and stir in remaining ingredients until evenly mixed. Pour into a well-buttered or foil-lined 8" or 9" (20 cm or 23 cm) square pan and smooth over top. Refrigerate until set, and cut into 12 squares.
I have added different flavoring as opposed to vanilla and it is fantastic with a different flavor.

Hope you all enjoy todays post.  Hope the fudge works well for you and that you get a chance to experiment with different flavors.  
Enjoy your day, enjoy your family and see you all here tomorrow, I will have a tutorial ready for you, as I am making toques and mitts for the giving tree at school.

Friday, November 26, 2010

Happy Christmas Tree Decorating Day!

So this morning I am going to share with you, a little insanity of mine...... I set my Christmas tree up in November.  I am not a die hard, I know some people who set theirs up November 1st, I tried it, didn't work for me.  But even though I waited until the end of November, I still get "the look".  Even still, it is not Christmas for me until I set me tree up in November and stress myself out trying to bake enough to feed Canada.  So here are a few pics of our tree and the kids decorating.  Hope that this gets you in the spirit too.


In case you're wondering about all the blurry pics of Chaos, he NEVER stops moving!!!!!!!

Enjoy you day, enjoy your life, don't let it pass you by.

Thursday, November 25, 2010

As Promised, A Little Less Procrastination

It took some time, but as promised, I finished the car bag, with a few minor changes.  Originally I was going to make it a double layer bag that I could leave in the car.  That still remains, but only 1 layer, for the simple fact that I don't want poor Chaos to sweat in it either, but at least he will remain warm and not be able to take his boots and socks off as soon as he gets in the car.  As I was sewing, I had an epiphany though, I am going to make another one, double layer, using an upcycled sherpa  fleece jacket that no one uses or fits as the inner liner. This one I will use for the stroller and sled and with any luck, it will be done before summer.

Now I know that you are all thinking that I can simply buy this at my local walmart, but the problem is, houdini Chaos can get out of almost anything, They don't make a size to fit him, and I need to be able to keep his boots on, hence my need to make him one.

So lets start with the tutorial.  If anyone wants the actual pattern, please let me know and I will email you the pdf.

Step 1:
Measure your child, you want to make this for their size, leaving room for winter gear and growing. Take your length measurements to your material.  You will need about 1 meter of fleece (or your material of choice), and a zipper, the length of your choice.  Fold your material in half and measure the length and width on the material.  Cut a rectangle from those measurements.

Step 2:
Cut a rounded bottom, and a quarter circle (?) from the top sides for the arm holes. (See picture below)


Step 3:
Turn material right sides together and sew a 1/2" seam from armpit all round the bottom to the other armpit.

Step 4:
Measure your neck opening, cut a half circle from the top middle on the front side of the material (only 1 side). From the middle of that opening, cut a straight linedown the middle to fit your zipper.

Step 5:
 Sew a 1/2" seam across the shoulders. stopping at the neck opening.

Step 6:
Cut your sleeve material out, to fit the armhole opening, again, see picture below, and I apologize that it's not so accurate on my part, but I have only ever done this for myself and I am trying.  So if any of the instructions are unclear, please let me know.

Step 7:
Sew sleeves on to arm hole, with right sides facing in. Sew the seam down the sleeve, again with a 1/2" seam.  Hem the sleeve.  Repeat with the other side.

Step 8:
Sew zipper in.  Not to many instructions for this, as I  have only done this once before, but it seems pretty straight forward.

Step 9:
Hem around the neck, with a 1/2" turnover. You will notice that I like to use a 1/2" seam more so than a 1/4" seam, I have found that with my kids, that extra 1/4" prevents the seams from tearing at all and their little fingers going through to make the hole bigger.

Step 10:
Now heres where it gets a little complicated for me as I am not so good with the button hole part, so I will do my best. Measure where the bottom buckle will come through sew a 2-3 inch button hole seam on both front and back of the car bag, not together, separately. Cut a slit through the middle.  The bag should fit nicely in the car seat and you have the choice to leave it in the car seat or take your child out with it.

I will show you the next one when I have it made.  Hope this works for you all and I would love to see what you have made too.


This is how the kids car blankets turned out, they wanted to go for a drive just to use them.  They LOVE them and maybe I won't have to listen to "He's touching me, She won't share the blanket with me.  MOOOOOOOOMMMMMM!!!!!!!"
Whatever makes them happy!

Enjoy your day, enjoy your family and happy crafting!

Wednesday, November 24, 2010

Cherish Yesterday, Live for Today, Dream of Tomorrow

I'm gonna take it away from the kids today and begin my morning by telling you my favorite quote.  It's on everyone's walls, in everyone's minds and even inked onto some bodies.  But it remains the truth.  It is by far the words that have stuck with for years, through bad and good times, when I have cried or laughed.

CHERISH YESTERDAY, LIVE FOR TODAY, DREAM OF TOMORROW

I have heard people talk about, and had conversations about what they would do different, or if they could go back with the knowledge they have now.  It is a wonderful thought really, but not me.  I am sure that I have done some things in my life that I regret and probably will for the rest of my life.  But those are just things, and had I not done them, said them, etc, I would not be where I am at this very moment.  I would not have my 3 beautiful children (however bonkers they drive me on a regular basis), I would not be happily married, I would not have this wonderful blog, or have the time, and financial capability to be a stay at home mother and take care of my children and craft and sew.  Now there is the possibility that it can be looked at from the other end too, not by me, but maybe some people aren't happy where they are.  Regardless though, I have seen far too many family members and friends of family suffer from varying degrees of memory loss, and the though remains, I would not change my past and although somethings I would like to forget, I will do my best to cherish them, because it could all slip away to easily.

Live for today also rings true in this household.  We are not big planners.  My husband surprised me this past spring with an impromptu trip to B.C and Washington, less than a week before we left (it may seem like plenty of time, but not so much with 3 kids, one of whom was still nursing).  We definitely think about the future, ours and our children's, but we refuse to miss out on the glories that this day has to offer.  It can all be taken away from you far too soon.

Dream of tomorrow.  I'm not saying that living for today should stop your dreams, there should always be dreams and hopes, however crazy or realistic.  Taking away some semblance in your life to daydream about your future, that trip to Vegas, or traveling around the world, or whatever your dreams may be.  For me, always dreaming will keep me the spry 16 year old that I always want to be (not actually 16 people, I  just act like it, and enjoy the immaturity I have, especially with my kids and their friends).

While I had no intentions of fully breaking this down for you, it just kinda happened.  I just wanted to tell you my favorite quote, the one I think about when I get up in the morning and when I go to bed at night.

Enjoy your day, your kids and your life.

Tuesday, November 23, 2010

Procrastination Part Deux

Ok, so I finally finished 1 blanket, and half finished another and half finished the car bag.  A little slow going today, as I am trying to finish before the really cold weather hits us and we actually have to leave the house.  Unfortunately I ran out of fleece for the car bag, so I do have to leave my hovel eventually.

But here's a start:

Blanket with attached pillow for the car.

Materials: 2 meters coordinating fleece, 13"x24" coordinating fleece, matching thread, polyfill (1 small bag will make at least 4 pillows)

Step 1: Try to get baby off the material, good luck with it.

Step 2: Sew right sides together leaving a 1/4"seam allowance. Also leave a 20" gap on the corner or side you plan to put the pillow on.

Step 3:
Sew a 1/2" top seam all the way around (except where the gap is)
Step 4:
Place right sides of the 13x24 fabric together, folded in half, and sew a 1/4" seam around, leaving the bottom end open for stuffing.

Step 5:
Stuff pillow with about 1/4 to 1/5th of the polyfill bag.  Push it as far back as you can sew you can sew the pillow into the blanket later.

Step 6:
Pin open side of pillow into open side of blanket, taking care to place it in straight and evenly on both sides. Sew across pillow and remaining open blanket seam with the 1/2"top seam.

Step 7:
Get husband to make funny faces while modeling the blanket, because the children are nowhere to be seen.  He's pretty handsome.


As for the other blanket, it will be finished this afternoon, I will post pics.  And the car bag will be finished tomorrow, I will post that on Thursday along with the tutorial.  And I will be sure to have something else ready for you too.

Thank you for bearing with me, and I promise to do better in the future.  Until tomorrow, I am still waiting for some christmas decoration upcycles.  Enjoy your day, enjoy your kids and happy crafting.

Part 1 and My Excuse; And Christmas Challenge #1

It's a snow day!!! Thats means that anything I had planned has officially been thwarted by 3 rugrats and a husband, who also will not go out in -35 (Celsius) weather.  So that means that I am going to do todays post in 2.  Ok and the worlds biggest procrastinator, aka me, has also come to a conclusion.  DO NOT LEAVE MY TUTORIAL POSTS UNTIL THE LAST MINUTE, ie tuesday morning as I'm rushing to finish something so that I can get it up for everyone.

So here's what I am going to do first, give you a sneak peek into what's coming up and then the challenge, like I promised yesterday.

I am going to turn this
Into 2 car blankets with attached pillows, because we live in the land of the frozen north; and also into a car bag for Chaos, who despite my best efforts refuses to keep shoes, socks, blankets, toques, mitts, etc on at any point in time, and again I am doing this because we live in the land of the frozen north.

And now for the challenge:

I know some, most of you parents out there have scads of artwork built up from your children, I know I do.  It gets displayed for some time, then out into a pile, separated by name, for them to decide what they want to hang onto in the future.  We have already done this with YaYa, as she is old enough to decide what was important, and also because she is a future art teacher and does not stop creating.
The problem, I have decided is that at christmas, all the teachers get together, and plan FABULOUS crafts and presents for my children to create (ok, ok I do it too), and as I was going through my christmas decorations I found and entire bucket of homemade stuff to display. Bare in mind that YaYa is in grade 6, but Supernan just started kindergarten and Chaos can barely have a functioning conversation.  I love everything equally, but there comes a time when you just don't have room to store or display everything for the holidays.  I do not want to get rid of this stuff either.
My challenge is this:
I would like the kids to repurpose, recycle, reuse the christmas decorations and make new ones.  I would love to see what you can come up with also.

I'm new to this link party thing, so any tips would be helpful, but please link up your ideas and pictures so that we can all see the wonderful things our kids can come up with.

I'll be back in a couple hours with the actual tutorial.

Monday, November 22, 2010

My Christmas Miracle and A New Way to Ohm

First of all, I'm gonna start my Monday, I'm sure jinxing myself, but it needs to be said.  Yesterday was family day.  Yesterday was also 3T's baby's birthday.  Little dude turned 2.  Now here is where it gets complicated.  I'm sure all of you mothers, at one point or another, have had your children "show off".  Not just singing and dancing, but put on their best show...... because you won't chastise  them in public (or so they think).  My 3 do just that, on a regular basis.  That being said, it's usually worse around certain people, not their fault, my kids just think that they need to be the center of EVERYONE'S universe.  (They are of mine, of course)  Yesterday though, something magical happened.  Some sort of Christmas miracle.  My kids........... listened (knock on wood that they can do it again in the future).  I don't just mean that they listened, but they played nicely with all the other children, they did not stand at the snack tables blocking everyones entry like a goalie up against Sid the Kid, they used their manners (even Chaos, who refuses to talk to anyone but me and Mad Chad), they did not rip into the presents or the cake, and absolutely nothing embarrassing came from their glorious little mouths.  Like I said, a Christmas miracle.  Thank you.

I would like to give you some infinite wisdom for Meditation Monday, but I really am still in shock from yesterday, lol.  So you get just plain ol' meditation ranting.
I really think that I have found my calling, my ohm so to speak.  For those of you who read my blog, if  you think waaaaaaaaayyyyyyy back to the first Meditation Monday, you will recall that I don't ohm.  Really I don't.  But I found my actual ohm zone.  Yogalates!  I am not some sort of crazed fitness junkie, or someone who is going to tell you 100 different ways to stay in shape, or live longer or lose weight (although this is fantastic for toning, lol).  But in my recent Yogafit class, a toned down version of yogalates, it came to me.  This is what I want to do, when I am happy, I want to go into a warrior pose and do the yoga version of 100's from there.  When I am angry, I want to go in a warrior pose, and do the yoga version of 100's from there.  And I want to do it all while listening to some classic '90's music.  I'm talkin Blue Rodeo, Michael Bolton, Roxette, Take That (Robbie Williams, oh yeah) and of course Jon Bon.  I really am being serious .  I found peace in that class and I did not want to leave.  So I guess my next step is loading up the ol IPod and givin' er.

I'm gonna give this question of the week thing 1 more try, maybe someone will answer me this week, or not.  But here goes anyways:

How do you find your peace? Not just to cool down, but in life.

Until tomorrow (be prepared for a challenge), ohm your way to happiness, however that may be. And enjoy your day.

Saturday, November 20, 2010

Corn and Chicken Dinner

Hi all, hope this saturday is treating you well, and that I caught you before shopping.  We are going to do a traditional chicken dinner, with a twist.  Hope you enjoy and please feel free to let me know what you think of this recipe.

3 garlic cloves, minced, divided
1/2 cup butter, divided
3 pound chicken legs and thighs (about 8 pieces)
3 ears fresh corn, husked, and cut into thirds
1/4 cup water
2 teaspoons dried tarragon, divided (oregano is an option)
1/4 pepper
2 medium zucchini sliced into 1/2 inch pieces
2 tomatoes, seeded and cut into chunks

In a large skillet or dutch oven, saute 2 garlic cloves in 2 tbsp of butter.  Add the chicken and brown on both sides.  Reduce heat.  Add corn and water.  Sprinkle with 1 tsp tarragon (oregano), and pepper.  Cover and simmer 20-25 min, until chicken is tender.

Meanwhile in a small saucepan, melt remaining butter.  Add remaining garlic and tarragon (oregano), simmer 3 min.  Layer zucchini and tomatoes over the chicken mixture.  Drizzle seasoned butter all over, cover and cook at least 3-5 min.

serves 6-8

Hope this serves as a nice family dinner, mashed or roasted potatoes is nice on the side.

Have a good weekend, enjoy your family, and we'll see you back here on monday.

Friday, November 19, 2010

More Pics and a Request

First of all, before any pictures are posted I would like to take a moment to reflect on a blog I read yesterday, kimboscrafts.blogspot.com.  This particular entry hit me a little close to home, seeing as how both boys were born early and stayed in the hospital.  I am going to repost her entry, and I would like everyone to think about helping out here, like she said, if everyone donates $1.00, well thats not a lot from this blog, lol, but you can pass it on, and we can keep it up.  Lets see if we can not only give our neighbors a hand, but maybe a little lift and help to those parents who really need it right about now.


11.17.2010

Pay it Forward.

okay...let's talk.

seriously.

(I know-- I had to try hard not to mention the Helen hunt movie)

but I have a story.

My niece (one of a set) (she's a twin if you didn't catch my drift.) had a drowning accident (and let me stop you right there and tell you she is 100% doing great)but my sister got life flighted off the mountain (where they were camping) with my niece to Primary Children's Medical Center.  And when she got there....she had her purse. That's it. Now us moms usually have a great deal in our purses...but it's usually for our kids....so it didn't help her much. She was there for a day or two before her husband was able to drive and bring her some much needed things.

Now while she was in the PICU (Pediatric intensive care unit) she met other families going through similar stories....and one of the people was the family of Preslee Sullenger. (you can read about her story HERE) Now little Preslee wasn't so lucky as my niece. and I can't imagine what her parents went through! my prayers were and are still with them.

Preslee's birthday is coming up..(dec 17)..and her parents wanted to do something special....
They (with another family) came up with Pay if Forward...(and you can read about how it came to pass HERE)
They are gathering supplies to put in totes to give out to all the parents who find themselves in the middle of chaos with nothing but the clothes on their back. This will help them stay by their babies side. (Cause a trip to walmart is really what you want to be doing at a time like this!)

They originally started with 44 bags (there are 44 rooms) and quickly changed it to 200! and I know we can all help out!!!

They have a list of items that would be especially helpful to parents (like a toothbrush...that is a MUST!) or if you want to donate money, they have a paypal account set up (click HERE

 To get the details of what needs to be donated (and specifics....and where to send it..or if you just want to donate money click HERE)

I'm going to pull a martha, "THIS IS A GOOD THING!"

and if anyone is in the pocatello area and wants to drop it off at my house, email me at kimbowest21@gmail.com. My sister is going up to help assemble them so I can be the pass between!

last count:


Trail Mix - 224 (112 Bags)
Goldfish - FILLED
Fruit Leather - 302 (50 Bags)
Camera - 23
Socks - 73 (36 Bags)
Playing Cards - 102
Ponytails - 154 (77 Bags)
Lotion - 57
Pens - 55 (18 Bags)
Journals - 14
Granola Bar Boxes - 91
Chapstick - 121
Eye Drops - 7
Toothbrushes - 400 FILLED
Toothpaste - 400 FILLED
Gum/ Mints - 400 FILLED
Blankets - 55

Entire Basket - 17 already donated.

They want to have all the supplies by dec 10 so they can assemble them ...and take it all up there on Preslee's birthday (the 17th)

Okay...look over at my followers count....if everyone donated $1....that's a load of cash! We can do some good people!

and this is where I go into remembering the "reason for the Season" and "it's better to give than to receive" and all that jazz....isn't it nice to help out? are you getting a warm fuzzy? I am.

GO....DO!


Now onto my pics:


They sure are cute aren't they?